Increasing Minimum Available GPM
Help, I Need More Water!
How can I get more water out of my existing water supply pipe? How can I increase the minimum available GPM for use in my irrigation design? These questions and variations of them are among the most frequently-asked questions I hear. A typical question would be something like this: "I have a 5/8" meter and a 3/4" copper supply, so according to the Sprinkler System Design Tutorial I only have 10 GPM available. This doesn't seem like very much, so I did a bucket test and got 18 GPM from it! So why can't I use the 18 GPM figure from my bucket test for my Initial Design Flow?" Well, the answer is you can use that higher value. Of course, you can also jump off a cliff if you want to, but it isn't a wise choice. There is more involved in determining your Design Flow than just measuring water in a bucket. The good news is that you MAY be able to use a higher flow. The bad news is it isn't easy or fast to determine if you can! So be patient, and read on. I know this is a long tutorial, but there are a lot of variables and I want to try to give you enough information to make a good decision.
The rest of this FAQ assumes your water is coming to you from a water supplier. If you pump your own water from a well, stream, or pond the only way to increase your water flow is to install a newer and/or larger pump, larger pipe leading to and from it, and possibly drill a deeper well. You will need to see the Irrigation Pumping Systems Tutorial for details on how to do that.
GPM definition: GPM is the standard unit of flow used in the USA, it means "gallons per minute". This tutorial uses GPM as the flow measurement. Metric countries use liters per minute (l/m) to measure flow. Multiply GPM x 3.78 to get liters per minute.
There are obvious advantages to having a higher flow rate available for your sprinkler system. Increasing your available water supply will reduce the number of valves you need, which could result in a less expensive controller, less wire, and, in general, a lower cost. The best way to increase the amount of water you have available is to have the water supplier install a larger pipe to your property. But in most cases these good options are expensive or not even possible. So the next best solution is to try to force more water through the existing pipe. Unfortunately, there is a lot of really bad advice floating around on how to determine the maximum flow for your sprinkler system. Most sprinkler contractors and sprinkler design guides focus on keeping the short-term costs down. After all, they want to make a sale, and the best way to do that is to have the lowest price. They will save you a few bucks up front when buying your system at the expense of hundreds or even thousands of dollars in repairs later on. The theory is that you are happy you saved money today-- and they won't be around when you are unhappy later! I don't play that game, so we're going to look at the risks, and then you can decide if it is worth it.
The Problems with Higher Flows
First, this FAQ assumes you have already worked through the process of calculating your flow used in my Sprinkler System Design Tutorial, and that you want to use a higher flow than what was recommended there. If you haven't read through at least the first 3 pages of that Tutorial, I recommend you do it before continuing here. The tutorial describes the best way to determine how much flow you will have to work with in designing your sprinkler system.
Keep in mind that what we are discussing here is the maximum available GPM flow. The maximum available flow is the starting point for your design. The actual GPM you should use for your irrigation system may be lower than this value for any number of reasons. As you work through the tutorial above, you will be able to determine the actual GPM you should use.
Now let's take a look at the significant risks involved in using a higher flow, so you know what you are getting into. The Maximum Available GPM figures I recommend in the Sprinkler System Design Tutorial are set at the maximum safe flow for your pipe size and type, as recommended by the vast majority of experts and the pipe manufacturers. It is correct that you can get a lot more water through that pipe. No doubt about it. You can force an almost unlimited amount of water through a pipe if you put enough pressure on the water. But is that wise?
Scrubbing
Velocity is the measurement of the speed at which the water is moving through a pipe. In the USA irrigation industry we measure this speed in feet per second (abbreviated feet/second or ft/sec). Flowing water is a funny thing, it seems rather harmless, but at very high velocities bad things begin to occur inside pipes. The first is what is called "scrubbing". Scrubbing is essentially the wearing away of the inside of the pipe one molecule at a time. It results from a number of different factors, but it's easiest just to picture the water as being very slightly abrasive. It just scrubs away at the pipe. As the water moves faster and faster, this effect gets considerably worse. Therefore, most industry sources recommend that you limit flow velocities to less than 7 feet/second, if possible. If the pipe is larger than 2", the recommended maximum velocity drops to 5 feet/second. Scrubbing is also worse in metal pipes, the slicker surface of plastics reduces the problem. Scrubbing combined with corrosion is the primary reason that copper pipes in houses develop pin holes over time and need to be replaced.
Water Hammer
The second problem that occurs at high velocities is "water hammer". Remember the Jan & Dean song Dead Man's Curve? Let's say you have a really fast Model A hot rod (what a thrill, can I hitch a ride?) You decide to take it out for a ride on Sunset Blvd. It would be safe to drive at 35 MPH, stupid at 50 MPH and sure death when you hit Dead Man's Curve at 80 MPH! In the same way, the water in your pipes can go pretty fast, but what happens when it hits that curve? How about if it hits a wall? The answer is called "water hammer".
Water hammer is caused when a valve quickly closes on the fast-flowing water in the pipe. For a great mental image of this, picture a large, very heavy, very long truck full of bananas driving straight into the face of a cliff. Got the image? Bananas everywhere! One last thing to be aware of is that water hammer problems are much more likely if you have water pressure over 60 PSI. If you want to read more on water hammer I have written an entire tutorial on the topic. You can read it here: www.irrigationtutorials.com/waterhammer.htm.
So can you use a higher flow? Sure, you can. But all bets are off. I know it saves a lot of money if you can use a higher flow and have a few less valves. But if you get a good case of water hammer, you can bet you are going to regret it. When a sprinkler valve shuts off at 4 AM in the morning and it sounds like the house was just hit by a truck, your spouse may hit you! Or maybe you'll just ignore the noise until the morning one of the hoses under a sink blows off due to the pressure surge, and the house is flooded. Then you may just wish you had spent a little more money on your sprinkler system! Scrubbing, on the other hand, is pretty easy to predict. If you exceed the recommended flows in the tutorial, you are going to get scrubbing damage, especially if you have copper pipe. What is next to impossible to predict is how much damage will be caused. As you increase the flow, the scrubbing gets progressively worse. It also depends on the type of pipe you have and how well it was assembled back when they built your house. If, in general, you have noted that your house is poorly constructed, you might want to think long and hard about this! But if the scrubbing isn't major, and the pipe and workmanship are good quality, it takes years and years for it to become a problem. How many years varies widely, but more than 10 years seems to be a reasonable expectation.
Well, at this point you need to decide how much risk you want to assume to save a few dollars. Unfortunately, I can't help you with this. It has to be your decision. So below I'll give you some new maximum flow rates, and also explain how to do a water hammer test.
Ready to Proceed?
OK, you understand the risks and you want to proceed anyway. The Maximum Design Flows that I give in the Sprinkler System Design Tutorial are based on maintaining a flow below 7 feet/second. Some people in the industry say you can go up to 10 feet per second, especially with smaller pipe sizes. I have never heard anyone with any training recommend a flow higher than that. The maximum flow values in the table below are based on 10 feet/second velocity. Flows over this value pretty much guarantee you will see major damage in the pipe.
Remember that the maximum flow must be based on the most restrictive pipe that the water passes through on the way to your sprinkler system. For example, let's say your house has a 1" PVC pipe that brings the water from the water company mainline out in the street to your house. When the pipe reaches the house, it changes to 3/4" PEX pipe through the house. In this case if you tapped into the 1" PVC pipe, then the 1" PVC pipe would determine the maximum flow. This is because the water going to the sprinklers goes directly from the 1" PVC pipe into the sprinkler system. You wouldn't need to consider the 3/4" PEX because the water never passed through it. However, if you tapped into the water supply inside the house after the pipe becomes 3/4" PEX, then the PEX pipe would determine the maximum flow because the PEX pipe has a lower maximum flow than the PVC. The most restrictive pipe that the water actually passes through determines the maximum flow.
"What if the smallest pipe is really short? Won't the water just squeeze through without problems? After all, a lot of water squeezes through a valve, and the opening in a valve is pretty small, right?" Yes, that is correct, and you can squeeze the water through. The problem is the scrubbing. A valve is made with a heavy body so it can stand up to the wear, but pipe, particularly copper, is not. My advice is to replace the small pipe section with a larger pipe. But yes, you can squeeze the water through if it is less than 3 feet long and you accept that the pipe will wear out faster.
NEVER EXCEED THESE FLOWS!
(GPM at 10 feet/second)
| pipe type | size | GPM |
|---|---|---|
| copper (type L CTS) | 1/2" | 7 |
| copper (type L CTS) | 5/8" | 10 |
| copper (type L CTS) | 3/4" | 15 |
| copper (type L CTS) | 1" | 25 |
| steel (galv. IPS) | 1/2" | 9 |
| steel (galv. IPS) | 3/4" | 16 |
| steel (galv. IPS) | 1" | 26 |
| PE "poly" (SDR-7) | 1/2" | 5 |
| PE "poly" (SDR-7) | 3/4" | 16 |
| PE "poly" (SDR-7) | 1" | 26 |
| SCH 40 PVC/CPVC (IPS) | 1/2" | 9 |
| SCH 40 PVC/CPVC (IPS) | 3/4" | 16 |
| SCH 40 PVC/CPVC (IPS) | 1" | 26 |
| PEX (CTS SDR-9) | 3/8" | 3 |
| PEX (CTS SDR-9) | 1/2" | 5 |
| PEX (CTS SDR-9) | 3/4" | 11 |
| PEX (CTS SDR-9) | 1" | 18 |
| CPVC (CTS SDR-11) | 1/2" | 5 |
| CPVC (CTS SDR-11) | 3/4" | 10 |
| CPVC (CTS SDR-11) | 1" | 20 |
Notes on using the table above:
CTS means "Copper Tube Size", IPS means "Iron Pipe Size". SDR means Standard Dimension Ratio (the ratio of the pipe wall thickness in relation to the diameter of the pipe).
If your pipe is larger than 1", you should have plenty of water, stick with the flows in the tutorial! Larger pipe sizes are much less forgiving of high-velocity flows.
What type of plastic pipe is it? PEX and PE are both polyethylene products. There is a lot of confusion over these two products. True PEX is a stronger form of cross-linked polyethylene that has become popular with plumbers in recent years. Both PEX and PE are flexible, and both have a glossy appearance and slick surface. So how do you tell which one you have? Older PE is almost always black, and in most cases PEX is not black. The surest thing to look for are the letters "PEX" printed on the tubing. Making things even worse, white PEX looks a lot like PVC, especially if it is old or dirty! PEX is easily scratched with a fingernail, PVC scratches, but not easily. PEX was not invented until the '70s, and it is seldom found in homes built before 1975. (It wasn't officially sold in the USA until 1985. Of course, if your house has been remodeled, you could still have it in a older house.)
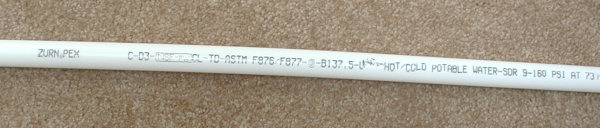
PEX tubing. Don't confuse it with PE or PVC!
Note the labels "PEX" & "SDR-9".
PVC plastic pipe is almost always white or gray and is more rigid than either PEX or PE. Another type of PVC called CPVC is sometimes used inside homes and often is found in older mobile homes. It is similar to regular PVC, but will be labeled "CPVC" and most often is a yellowish, gold, or tan color. CPVC in homes is usually copper tube size (look for "SDR-11" printed on the pipe), but is also sometimes IPS (SCH 40). Confused yet? Your best bet is to find lettering on the pipe that says what type it is.
CRITICAL! Your maximum flow MUST be based on the most restrictive pipe size and type between the water company's mainline and your sprinkler system. Even if you use a 1" PVC pipe for your irrigation system, if you are tapping into a 3/4" copper pipe to get the water, then the 3/4" pipe determines the maximum flow. Think of it this way- you may have a huge mouth, but if you are trying to suck soda through one of those tiny straws used to stir coffee you will not get much soda! The pipes leading to your irrigation system are like that tiny straw. The smallest, most restrictive one determines how much water gets through.
Water Hammer Test:
If you're going to try using a higher flow, you need to perform a water hammer test. I know this takes time and effort, but it is necessary.
This test is absolutely critical if you plan to tap into a pipe that comes out of the side of your house, like a hose bib. This is because you don't know what size pipes they used inside the walls of your house. Just because the plumber should have used a big pipe doesn't mean he did. Maybe he ran out of the correct size of pipe and didn't want to make another trip back to the shop to get pipe, so a small pipe he has handy gets installed. Who knows. All I know is it happens.
Understand that no test is perfect. This test will identify if water hammer will occur under the conditions which you run the test. Conditions can and do change. If you happen to run the test while your water company's water pressure is abnormally low, you could get a false negative for water hammer. Plus other things can cause water hammer, such as designing your sprinkler system wrong. I do not guarantee that a negative result with this test will mean no water hammer will occur in your sprinkler system.
Tip: If you aren't familiar with the terms used here, see the Glossary and the Understanding Fittings pages. Also, a picture is worth a thousand words, so here's a diagram of what I am about to try to explain!

- Go shopping! Here's a few of the items you will need:
- Pressure gauge 0-100 PSI (or higher.)
- 1" electric irrigation valve (make sure it has a flow control on it, and it is best if it is the same brand and model you plan to use for your irrigation system.)
- 1" brass ball valve.
- 3 nine-volt batteries.
- 1" pipe (more on what type and how much pipe is discussed later)
- Whatever fittings you need to connect it all to the house water main as described and shown in the diagram above.
- Tap into the water supply pipe at the point where you want to take your irrigation system water from (the "Water Source Point of Connection" in the diagram above.) You will reuse this tap for your irrigation system water supply, so it won't be wasted. Keep in mind that the further this tap is from where the water supply pipe enters your property, the more chance you have of creating water hammer problems! The worst possible place to tap into is a hose bib sticking out of the side of the house. The best place to tap into is the supply pipe right after the water meter (if you have one.) The second best place to tap into is right after the main water shut-off valve for your house's water supply.
- Install the ball valve as close as you can to the tap point, but make sure it is in a easily-accessible location. This will become your emergency/winter shut-off for the irrigation system, so it will be permanent. You won't remove it after the test, so do a good job of installing it!
- Install a 1" section of pipe going from the ball valve to the pressure gauge location. Suggestion: it will be easier if the pressure gauge and electric irrigation valve are above ground. This pipe can be as long as you like, but should not be less than 12" long. It can have as many directional changes as needed to get it above ground or outside of the house. If part of this pipe will be inside your basement or crawl space, it should be the same type of pipe that is used inside the rest of your house. In may places it is not legal to use PVC or PE pipe inside or under a house. Even if it is legal I don't recommend it.
- Install a tee (a fitting, shaped like a "T", that adds an outlet to a pipe) and attach the pressure gauge to the outlet of the tee. Most pressure gauges come with a hose adapter on them, which has 3/4" female hose threads. Most pipe has IPS threads, which are not the same as hose threads. However, you can attach the 3/4" hose connection onto a 3/4" plastic male pipe thread with a little force (ie; use a wrench.) This is only temporary, so it will be OK. Do not leave the pressure gauge permanently connected. Remove it after you are done with your test. All but the most expensive pressure gauges will "stretch" over time and stop working accurately if you leave them connected to a water source.
- Install another short section of pipe after the pressure gauge and then install the electric valve. Note that water may spill from the valve during the test, so it is best if the valve is installed outside.
- Now install as much 1" pipe as needed to go from the electric valve to some place where you can dump a lot of water and not make too big of a mess. We'll call this the "blow off" pipe. This pipe is temporary, so just lay the pipe on top of the ground. This pipe can be up to 100 feet long, if needed. Remember you will need to get a 5 gallon bucket under the pipe outlet, so you may need a few ells in the pipe to go up over the top of the bucket. If you used PVC pipe, let the glue dry for an hour before proceeding.
- Now slowly open the ball valve to the full-open position. Check the pressure reading on the pressure gauge and write it down. This reading is your static water pressure. You will use it when you design the sprinkler system. If you use my Irrigation Design Tutorial, this will be your "Design Pressure"
- Now test and break-in the electric valve. Close the flow control on the valve. Next, manually open the electric valve using the on/off lever on the valve (on some valves you do this by turning a knob or loosening a bleed screw, see your valve instructions). Wait 30 seconds, then open the flow control to the fully-open position. The water should start flowing as you open it. Let it run for at least a minute, then turn the manual on/off lever to the off position. It may take up to two minutes for the water to stop flowing through the valve. Don't panic, this is normal. If the electric valve still does not close after a couple of minutes, it probably has an air bubble caught in it. Again, this is very common with brand new valves. Try re-closing the flow control on the valve, then reopen it. If this doesn't work, another trick is to go press your hand over the outlet of the pipe to create some back pressure on the valve. (You will get wet doing this!) Once you have it working, break in the valve by opening and closing it a few times, using the manual on/off lever.
- Now the flow test! Open the electric valve using a test battery setup (see below.) To do this just touch the wires from the valve to the end terminals of the test battery chain. With the wires connected to the batteries the valve should open. When disconnected, the valve should close (again, it may take a couple of minutes to close). Open and close the electric valve several times to break in the solenoid.
- Next, open the electric valve using the batteries. Check the pressure gauge. If it shows less than 35 PSI, then slowly close the flow control knob/handle on the electric valve until the pressure on the gauge moves up to 35 PSI. Once the gauge is reading 35 PSI (or more) go measure the flow coming out of the end of the pipe using your bucket (see method below.) If the flow is higher than the maximum flow you determined using the table above, close the flow control knob/handle a little and retest. Continue closing the flow control knob/handle until you get the flow down to (or below) the maximum flow.
- Finally-- it's time to test for water hammer! Close the electric valve by disconnecting the battery. Did you hear a bump, bang, or multiple bumps when the valve actually closed? If so, that is water hammer. A soft thump heard at the valve is OK. All valves make some sound when they close. What you don't want is a very solid-sounding thump, multiple bumps, or any loud noise that you can hear in the house. Anything that sounds like a hammer hitting the pipe is bad. Now that you have it all set up, run the test several times late at night when it is quiet and again very early in the morning during the most likely time you will be irrigating. Do you hear any water hammer at those times? Listen both at the valve and inside your house. If you do hear water hammer, you need to reduce the flow a little , (close the flow control knob/handle a little more) then repeat the test. Continue until you reach a flow where you don't hear any water hammer. This flow is the maximum flow you should use for designing your irrigation system.
Bucket Method GPM flow test:
Get a 5-gallon bucket. Old paint buckets work great. Since most 5-gallon buckets actually hold more than 5 gallons of water, you will need to calibrate the bucket as follows: Find an accurate measuring container, and measure out 5 gallons of water into your bucket. Then mark the water level on the side of the bucket with a marking pen so you can easily see it. The test is simple. Put the bucket under your water outlet pipe and time how long it takes to fill the bucket to 5 gallons. The formula for calculating the flow in GPM is: 300 divided by the seconds it takes to fill a 5 gallon bucket = GPM.
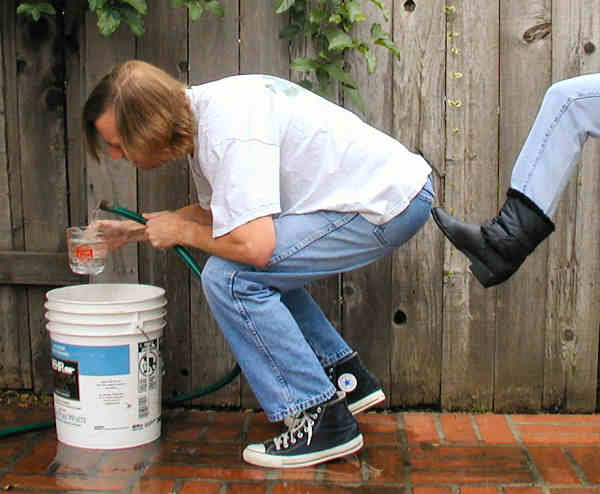
Guys- don't use your wife's favorite kitchen measuring cup!
Battery test setup:
Use 3 standard 9-volt batteries (the rectangular type with snap connectors on top.) Using the male and female snaps on top of the batteries, snap all three of them together in a chain. This creates a home-made, portable, 27-volt valve tester. Now touch the valve solenoid wires to the end terminals on your battery chain. The valve should open. Easy. Cheap. And it works great!
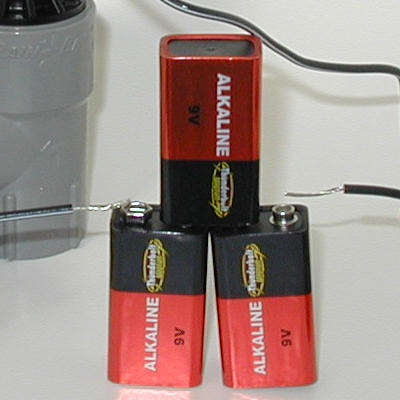
Using a chain of 9 volt batteries to open a valve.